|
|
|
|
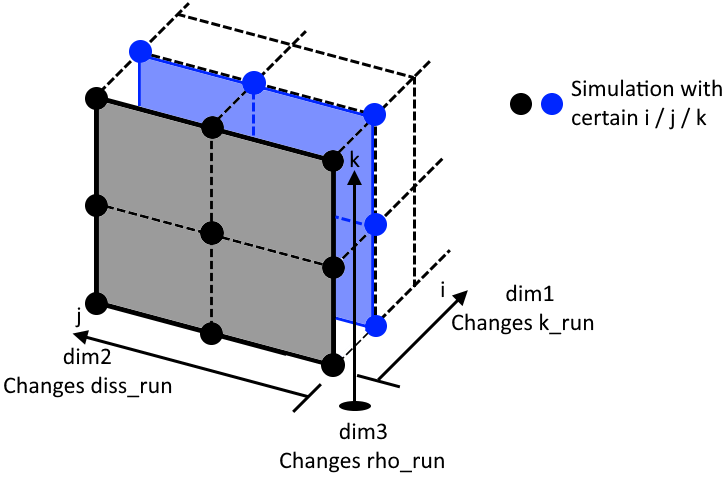
This tutorial is an extension to ParameterStudy2DDemo, and therefore has similar code structure. In ParameterStudy1DDemo and ParameterStudy2DDemo it has been shown how to do 1D and 2D parameter studies. In those cases only the particle diameter has been changed, based on the simulation that is run. In this tutorial it is shown how to perform a 3D parameter study on contact model properties, more specifically on studying the effect of stiffness, dissipation and density. The parameter space now looks as follows:
The following headers are included:
These are the headers needed for this tutorial.
The main class inherits from Mercury3D.
All steps needed in order to create this class are explained below.
Step 1: (Private) Member variables.
Similar to the extension of 1D to 2D parameter studies a new integer is introduced to store the size of the third dimension of the parameter study. Furthermore the vector studyNum is again extended with 1, as it needs to store the information of the third dimension. studyNum is now build up as follows: The first entry is (still) storing an integer value giving information of the completeness of the parameter study. The second, third and fourth entry store the current run in the first, second and third dimension respectively.
Step 2: Set- and Get-functions for private member variables.
The set- and get-functions are extended to incorporate the third dimension.
Step 3: Create the particle species.
This tutorial was build around the wish to perform a 3D parameter study over the contact model properties. Hence, compared to ParameterStudy1DDemo and ParameterStudy2DDemo, setting the particle species is now important. The code however is still very similar, as createSpecies() had already been incorporated in the class. For this reason we can simply use the same functions as before to get the simulation run numbers. In this case it has been chosen to vary the stiffness, dissipation and density of the particles. However, if desired, all other particle properties could be changed by the run numbers.
Step 4: Setting up the initial conditions.
The only difference with respect to ParameterStudy1DDemo and ParameterStudy2DDemo is that now the particles do not vary in size anymore.
Step 5: Setting up the parameter study.
Nothing changed with respect to ParameterStudy2DDemo, both actionsBeforeTimeLoop() and actionsAfterSolve() are the same.
Step 6: Creating the main function.
The only difference with ParameterStudy3DDemo is that now all three study dimensions have to be set.
This line results in 12 simulations being run, in which all combinations of the contact model parameters are solved.
If you would like to look at the 1D or 2D parameter study demos:
ParameterStudy1DDemo
ParameterStudy2DDemo
Or return to Overview of advanced tutorials